

Administration of TIBCO® Metadata Agent
TIBCO Cloud™ Metadata subscription
New connection for a previously deleted agent
On the first start, the agent will subscribe to the corresponding Metadata system. As a result of this interaction, a GUID will be stored in the agent storage and will be used for all exchanges between the agent and Metadata.
If you delete a managed agent in Metadata ‘Administration’ menu, the GUID stored on the agent’s side will no longer be valid.
To recreate a deleted agent, you have to delete the agent’s H2 database (configDB.mv.db) and restart the agent. It will automatically subscribe to Metadata and obtain a new GUID.
Public key update
The Public key (JWT) is a unique token used for additional security in exchanges between the agent and Metadata.
It is valid 60 days and expires automatically after. Connections with an expired JWT are not accepted by Metadata and a specific exception is generated to notify the agent that its public key is no longer valid: ‘JWT for the Agent with id xxx has expired or is not valid. Please, get update the JWT in the Agent’s properties’.
After seeing this message you need to obtain a new JWT from Metadata administrator, copy-paste it in the ‘public-key’ property in the agent’s properties file and restart the agent.
TIBCO® Data Virtualization for TIBCO Cloud Metadata
To use the Metadata harvesting feature of TIBCO Cloud™ Metadata, you need to install TIBCO® Data Virtualization (TDV) on your system.
TDV allows scanning data sources that exist on your system and retrieve metadata. In Metadata, the main purpose of TDV is to provide raw metadata to be stored in the cloud.
You need to install two TDV application parts:
- TDV Server - the server part of TDV. It is mandatory to install the TDV server to gather metadata from your system.
- TDV Studio - the client part of TDV. You only need to install it if you want to create your data sources and access public views from TDV locally.
Please, refer to the ‘Installation Guide’ provided with your copy of TDV for the installation requirements and process.
The required TDV version for Metadata Agent is TDV 8.3.
Please find below an overview of the features that you may use in conjunction with Metadata.
We recommend using the corresponding TDV documentation for guidance on these features.
Create a data source
If you want Metadata to gather information about your existing data sources, you need to first configure them in TDV.
You can do it using the TDV Studio ‘New Data Source’ function.
On the first step of creation, you will be prompted to choose a connector for your new data source. Currently, Metadata Agent supports the following TDV connectors:
- REST
- SOAP
- WSDL
- File-Delimited
- File-XML
- Microsoft Excel (non-ODBC)
- DB2 v10 (Type 4)
- DB2 v11 (Type 4)
- DB2 v9 (Type 2)
- DB2 v9 (Type 4)
- DB2 z/OS (Type 4)
- DB2 z/OS v11 (Type 4)
- HBase
- HBase 0.98 (Apache Phoenix Driver)
- HSQLDB 2.2
- Microsoft SQL Server 2008
- Microsoft SQL Server 2012
- Microsoft SQL Server 2014
- Microsoft SQL Server 2016
- MySQL 5.1
- MySQL 5.5
- Oracle 11g (OCI Driver)
- Oracle 11g (Thin Driver)
- Oracle 12c (OCI Driver)
- Oracle 12c (Thin Driver)
- PostgreSQL 9.0
- PostgreSQL 9.1
- Azure Data Lake Gen2
- Azure Synapse
- Azure SQL Database
Once you select the connector, you will be prompted to provide a label for this data source and connection details for TDV to access the physical data source on your system.
You don’t need to run the introspection on the new data source as ADS can do it automatically. However, it is recommended to finalize the data source creation using the ‘Create & Introspect’ button rather than ‘Create & Close’ as this allows you to test the connection and to make sure that TDV has access to the physical data source on your system.
Once the data source is correctly configured in TDV, it becomes visible to Metadata Agent and you can run metadata harvesting for this source.
View public data sources
Metadata Agent can create a published view of your assets and data sources by running the metadata provisioning function.
This creates a public data source in TDV that you can access using TDV Studio.
Public data sources are available in TDV under the folder ‘Composite Data Services’ that is shared by all TDV users and can be exposed to the external software via JDBC queries.
Metadata Agent creates your public data source under ‘Composite Data Services’ - ‘Databases’ with the label defined during the metadata provisioning launch.
Data sources and resources corresponding to the assets that you have selected for provisioning are assembled in this public data source and their metadata is visible in TDV Studio and in the system database that third-party software can query.
Common error messages
In some cases, the interaction between Agent and TDV can fail because of the incorrect settings or incompatibility. Below is the list of common errors that may be solved by fine tuning on either TDV or Agent/Metadata side.
| Error message | Reasons and resolution |
|---|---|
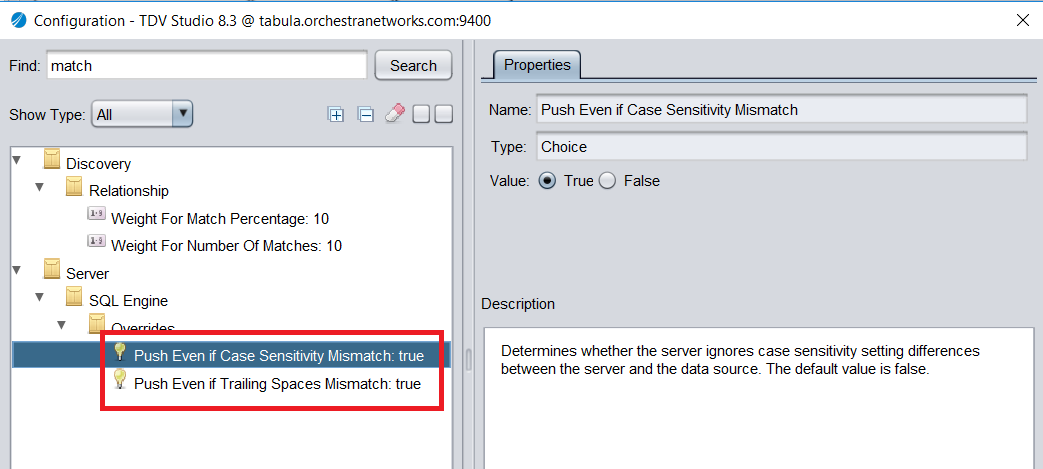
| Selectable EBX_HG_ACCOUNT.OP cannot be pushed because the data source does not support upper functions and case sensitivity setting doesn't match | This error message may appear during sampling or profiling of the data on certain data sources. To avoid this go to TDV Studio - Administration - Configuration menu and type 'match' in the search bar.
Look for the 'Push even if Case Sensitivity Mismatch' setting and switch it to 'true'. It is recommended to do the same for the 'Push even if Trailing Spaces Mismatch'.
Save and apply these changes to solve the issue.
|
Agent Migration and Backup
If you need to migrate your existing Agent and preserve its connection to Metadata, please, follow the process below:
- Stop agent.
- Backup agent’s database and Quarz Scheduler database by copying files
configDB.mv.dbandquartzDB.mv.db - Backup your
application.propertiesfile. - Install the agent on the new instance.
- Copy databases backup into
[[Installation folder]]/storage. - Copy properties file into
[[Installation folder]]/conf. - Update
ma.http.ws-urlandma.http.port. - Update other properties if necessary.
- Restart agent. It will automatically update registration information in Metadata.